Hill Engineering has published a comprehensive case study evaluating the repeatability of contour method residual stress measurements across a variety of materials, processes, and geometries. This study provides valuable insights into the precision of the contour method, reinforcing its reliability for residual stress analysis.
Category: Contour Method
Search results for Hill Engineering blog posts under the subject category contour method
Contour Method Reproducibility Publication
Hill Engineering has participated in a collaborative, interlaboratory effort to quantify contour method residual stress measurement reproducibility. The study, entitled ‘Interlaboratory Reproducibility of Contour Method Data in a High Strength Aluminum Alloy’ was published through Experimental Mechanics, and is provided open access on Springer Link. The background, objective, and methods from the abstract text are as follows:
Continue reading Contour Method Reproducibility PublicationHill Engineering featured in Railway Track & Structures – August 2022
We recently learned that some hole drilling method and contour method results were highlighted in the August 2022 issue of Railway Track and Structures. The article is titled Residual stress investigation of ultrasonic impact treated and untreated thermite welds.
Continue reading Hill Engineering featured in Railway Track & Structures – August 2022Contour Method 101: Two-Dimensional Mapping of Residual Stress
We talk a lot about the residual stress measurement techniques we employ at Hill Engineering. One of the most commonly used is the Contour Method! Invented in the year 2000, and patented by Los Alamos National Laboratory, the contour method measures 2D residual stresses over a planar surface.
Continue reading Contour Method 101: Two-Dimensional Mapping of Residual StressContour method uncertainty
The contour method is a residual stress measurement technique that provides a two-dimensional map of residual stress on a plane. Hill Engineering’s uncertainty estimate for contour method measurements is summarized here. For additional information, refer to the references below.
The contour method uncertainty estimate accounts for two main, random uncertainty sources present in contour method measurements. This includes the uncertainty associated with random noise in the surface height profiles called the displacement error, and the uncertainty associated with choosing a specific analytical model to fit the surface profiles called the model error.
The displacement error is estimated using a Monte Carlo approach that applies normally distributed noise to the each of the original measured surfaces. The normally distributed noise is prescribed to have approximately the same magnitude as the surface roughness that arises from EDM cutting. Stress results are found using five different sets of random noise added to the surface height profiles, and the standard deviation of those five residual stress results at each spatial location is taken as the displacement error.
The model error is estimated by taking the standard deviation of the residual stress results using displacement surface profiles that have been fit with different analytical models (centered around what was determined to be the best fit). Each case uses a different number of fitting coefficients.
The total contour method uncertainty is then taken as the root-sum-square of the displacement and model errors with a minimum value of uncertainty set as a floor. The floor used is the mean of the total uncertainty (prior to the application of the floor), which is evaluated over a regular grid. The uncertainty estimate is assumed to have a normal distribution, which implies that one standard deviation represents a 68% confidence interval.
An illustrative example of the contour method uncertainty calculation is provided below from a measurement on a dissimilar metal welded plate.
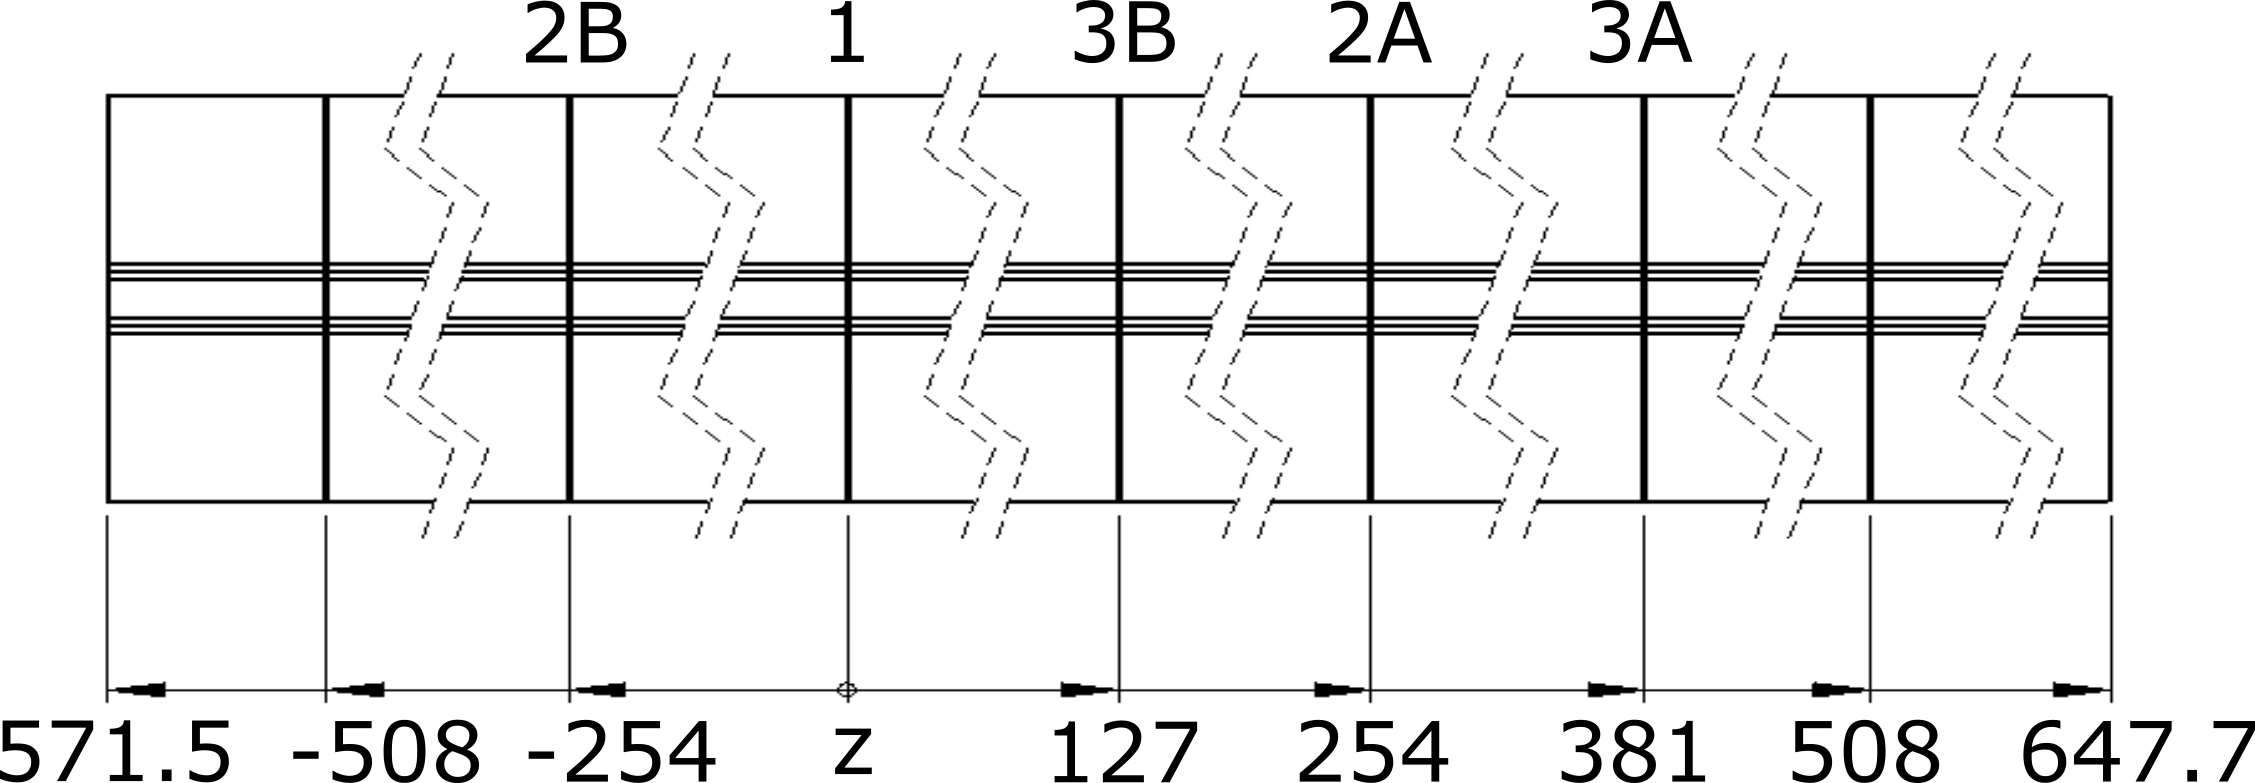
Stainless steel dissimilar metal dimensions and measurement locations (dimensions in mm)
The measured residual stress in the test specimen is shown below.
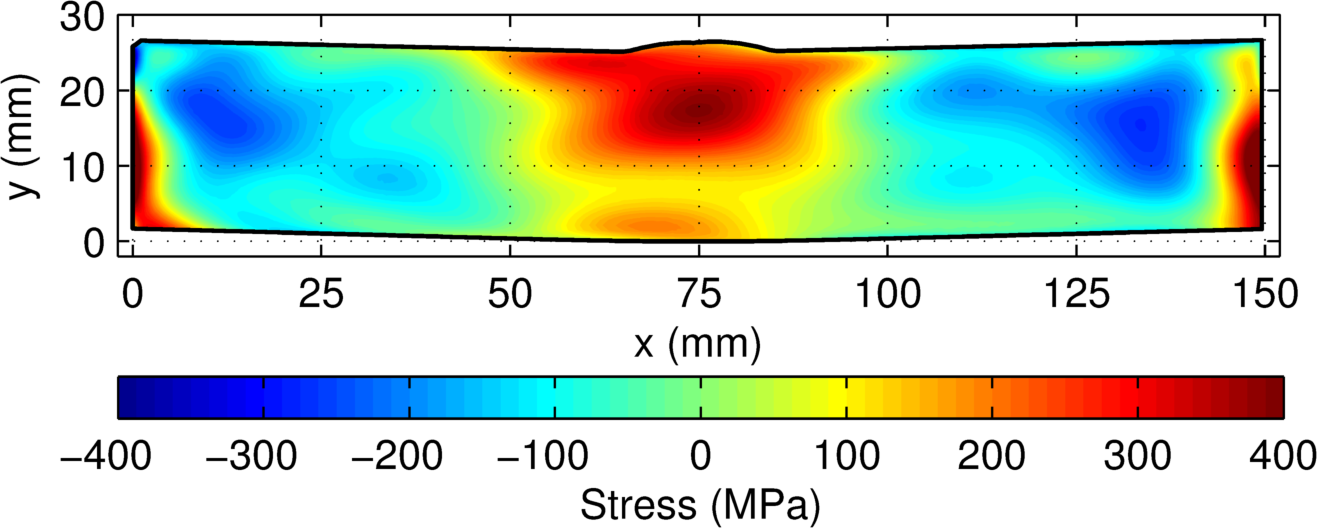
Measured residual stress (σzz)
The model error for the measurement (below) is largest along the part boundary (95th percentile is at 41.0 MPa). The displacement error (also shown below) is largest along the part boundary (95th percentile is at 11.8 MPa). The displacement error is much smaller than the model error. The total uncertainty has nearly the same distribution as the model error (95th percentile is at 42.5 MPa) with a 17.5 MPa floor covering most of the cross-section.
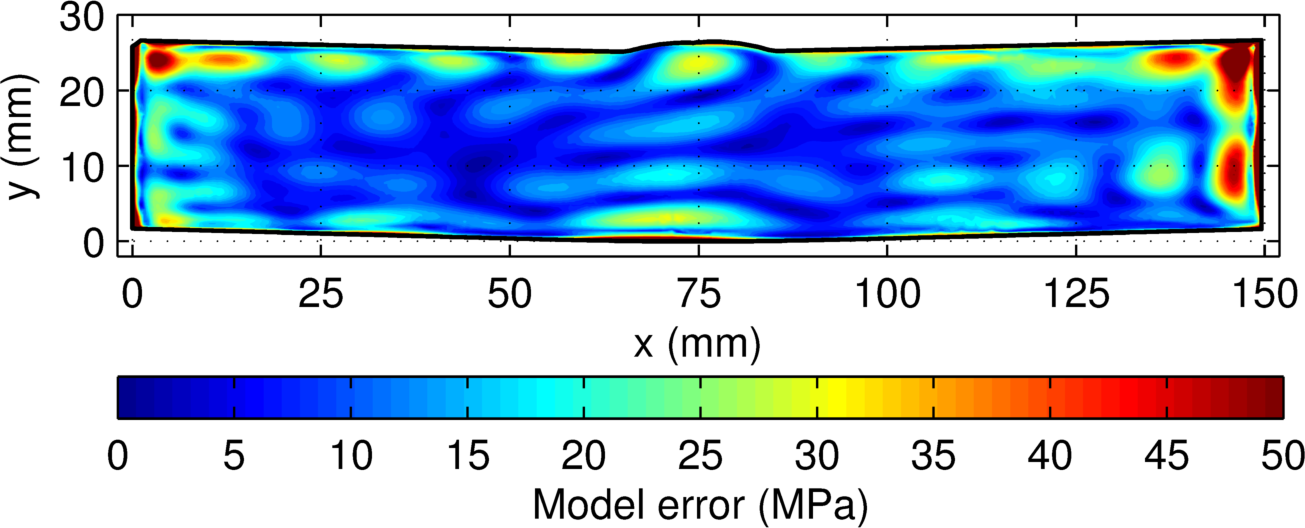
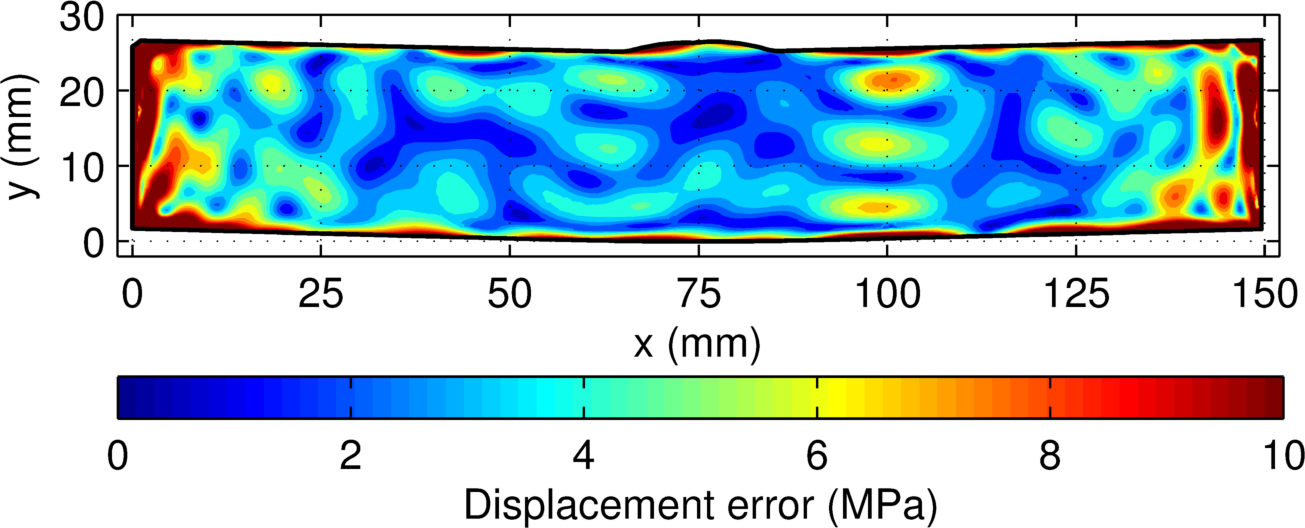
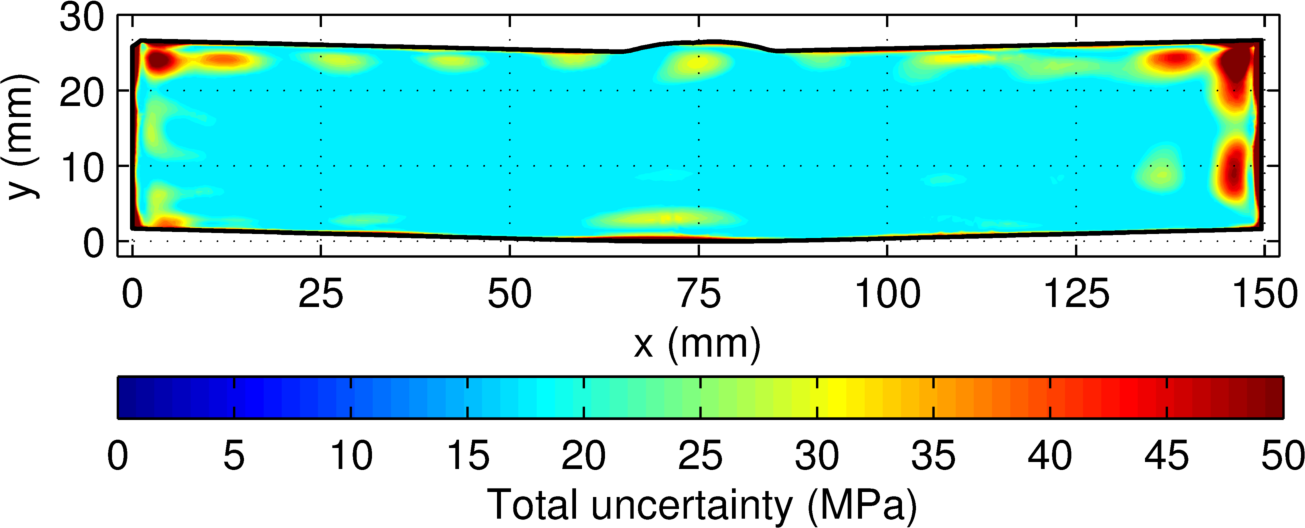
(top) Displacement error, (middle) model error, and (bottom) total uncertainty for the stainless steel DM welded samples
If you would like more information about using the contour method to determine a 2D map of residual stress in your parts please contact us.
Happy 20th birthday to the contour method
Today marks a major milestone in the field of residual stress measurement. The contour method, one of the most useful and advanced residual stress measurement techniques, was first successfully implemented on this date (August 16th) in 1999 by Mike Prime at Los Alamos National Laboratory. The most significant feature of the contour method is its ability to generate detailed two-dimensional residual stress maps like the one shown below. Please join us in wishing the contour method a very happy 20th birthday! Continue reading Happy 20th birthday to the contour method
Additive Manufacturing Benchmark Publication
Hill Engineering recently contributed to a publication related to residual stress measurement in additive manufacturing (AM) test specimens titled, Elastic Residual Strain and Stress Measurements and Corresponding Part Deflections of 3D Additive Manufacturing Builds of IN625 AM‑Bench Artifacts Using Neutron Diffraction, Synchrotron X‑Ray Diffraction, and Contour Method. The work was performed under the NIST AM-Bench program in collaboration with researchers from NIST, Los Alamos National Laboratory, University of California Davis, and Cornell High Energy Synchrotron Source. The abstract text is available here along with a link to the publication. Continue reading Additive Manufacturing Benchmark Publication
Additive Manufacturing Benchmark Test Series
As a follow-up to our previous post about additive manufacturing (AM) we wanted to highlight some other activities in the additive manufacturing space.
One such activity that Hill Engineering has been involved in is the NIST AM-Bench program. AM-Bench is developing a continuing series of controlled benchmark tests with two initial goals: 1) to allow modelers to test their simulations against rigorous, highly controlled additive manufacturing benchmark test data, and 2) to encourage additive manufacturing practitioners to develop novel mitigation strategies for challenging build scenarios. As part of this program, Hill Engineering has been working in collaboration with UC Davis to support residual stress measurement activities using the contour method. Continue reading Additive Manufacturing Benchmark Test Series
Residual stress in additive manufacturing
Additive manufacturing (AM) is a manufacturing process that deposits material in a controlled manner to build three-dimensional part geometry (bit by bit). This is in contrast to traditional manufacturing processes where material is cut or removed (i.e., subtracted) from the raw stock to create the intended part shape. The potential for additive manufacturing to significantly improve the economics and performance of manufactured parts for certain applications has made it a popular topic. However, since most additive manufacturing processes are highly thermal (e.g., material is deposited in a melted form and solidifies into the desired shape) significant residual stresses can develop. Hill Engineering has been working with many collaborators to better understand the influence of these processes on residual stress. Continue reading Residual stress in additive manufacturing
Hill Engineering acquires new 3D scanner
At Hill engineering we are always looking out for new technologies to improve our laboratory capability. As a part of this ongoing mission, we recently acquired a Nikon ModelMaker H120 3D scanner to incorporate in our lab. Continue reading Hill Engineering acquires new 3D scanner