We are in the process of organizing a special Issue of Experimental Mechanics, the journal of the Society for Experimental Mechanics. The issue will be devoted to Advances in Residual Stress Technology in honor of Prof. Drew Nelson of Stanford University, for teaching several thousand engineering students about the importance of residual stresses and for developing new optically based approaches for measurement of residual stresses, along with studies of residual stress effects on fatigue. To date, we have accepted proposed paper topics from almost 20 world-leading authors from around the globe.
Continue reading Special Issue of Experimental MechanicsTag: residual stress
Search results for Hill Engineering blog posts containing the tag residual stress
Turbine Engine Technology Symposium 2021
Hill Engineering will be presenting at the upcoming Turbine Engine Technology Symposium (TETS) scheduled for September 15-17, 2021 at the Dayton Convention Center. We invite you to come see us.
The TETS Symposium is a biennial forum where the United States’ turbine engine community gathers to review and discuss the latest turbine engine technology advances. The Symposium draws an audience of approximately 1000 engineers, scientists, managers, and operational personnel from throughout the turbine engine community, including the Army, Navy, Air Force, NASA, DARPA, DOE, FAA, engine and aircraft manufacturers, material and component suppliers, and academia.
Hill Engineering’s presentation will include a summary of recent work related to predicting residual stress and airfoil distortion from shot peening and laser shock peening. The abstract text is presented below.
Continue reading Turbine Engine Technology Symposium 2021ASM Heat Treating Society 31st Annual Conference And Exhibition
Hill Engineering is presenting “Evaluation of forging process induced residual stress in aluminum die forgings” at the ASM Heat Treating Society 31st Annual Conference and Exhibition. Held Tuesday, September 14, 2021 – Thursday, September 16, 2021 in St. Louis, MO, Heat Treat is the premier conference and expo for heat treating professionals; attracting global innovators, researchers, influencers and decision makers from around the world. This year’s conference and expo will feature two-and-a-half days of face-to-face networking opportunities with approximately 200 heat treat exhibitors/companies. The abstract text is presented below.
Continue reading ASM Heat Treating Society 31st Annual Conference And ExhibitionA Delightful Celebration of Five Golden Years
This week, we’re celebrating five years at our Gold Canal Drive facility in Rancho Cordova, California. Hill Engineering acquired the building in 2016 to meet the rising demand for residual stress measurement, fatigue analysis and design, and residual stress engineering services.
Continue reading A Delightful Celebration of Five Golden YearsHill Engineering Now Admitted to Forging Industry Association
Hill Engineering was recently admitted to the Forging Industry Association (FIA). For more than 100 years, the FIA has been helping forging companies in North America to increase their global competitiveness. FIA’s producer member companies manufacture approximately 75% of the custom forgings volume produced in the United States, Canada and Mexico. Its supplier members manufacture materials and provide services used by the forging industry. Together, FIA’s 200 members comprise the only trade association dedicated to promoting and serving the forging industry in North America.
Continue reading Hill Engineering Now Admitted to Forging Industry AssociationHill Engineering awarded patent for innovative DART system
Hill Engineering was recently awarded US Patent 10,900,768 for residual stress measurement technology. Granted on January 26, 2021, the title of the patent is “Systems and Methods for Analysis of Material Properties of Components and Structures Using Machining Processes to Enable Stress Relief in the Material Under Test..” The patent abstract is available below. There is a link at the end to download and read it in full.
Continue reading Hill Engineering awarded patent for innovative DART systemRapid Forge Design brochure
Hill Engineering’s Rapid Forge Design is an automated tool for the fast and reliable design of 2-piece, closed-die impression forgings. The brochure below provides a rundown of the highlights from this powerful software, which can drastically reduce the time needed to design a forging to industry-accepted standards.
Mechanical stress relief of aluminum alloys
As we discuss in a related case study, aluminum alloy heat treatment is a three-step process designed to achieve the desired properties. The process involves: 1) solution heat treatment (SHT) at an elevated temperature below the melting point, 2) quenching in a tank of fluid (e.g., 140-180°F water), and 3) age hardening. While providing good properties, the heat treatment has the negative side effect of creating bulk residual stress and distortion. These side-effects are a direct result of non-uniform cooling during the rapid quench. One approach to mitigate this problem is the application of a post-heat treatment mechanical stress relief process. In addition to modeling the heat treatment process, our analysis tools can support evaluation and optimization of mechanical stress relief processes.
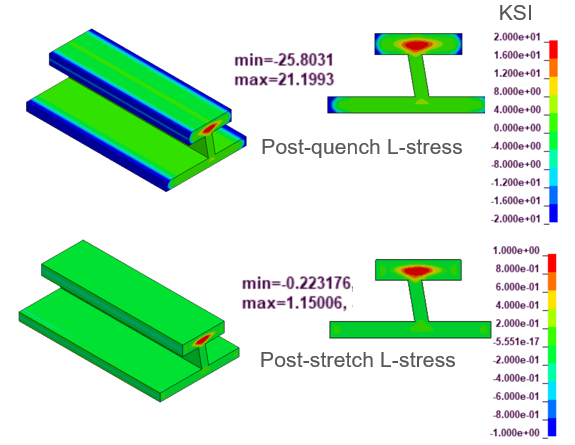
Mechanical stress relief is practical for many aluminum alloy products as a means of reducing bulk residual stress. For products with a uniform cross section, such as most extrusions, plate, and bar stock, the material can be stretched on the order of 1% to 5% using special equipment. The figure below shows an example extrusion section with bulk residual stress (top) along with the remaining residual stress after mechanical stress relief (bottom). Note, the use of different color scales because the residual stress magnitude changes so significantly. This figure illustrates our capability to model post-quench and post-stretch residual stress.

Illustration of predicted post-quench (top) and post-mechanical-stress-relief-stretch (bottom) in the long direction of an example aluminum extrusion
For other products such as forgings, an alternative stress-relief process using a compressive cold work stress relief can be employed. For a hand forging this is usually achieved using open-dies comprised of mostly flat surfaces. Post-quench, the hand forging is subjected to 1% to 5% compression often in an overlapping fashion.
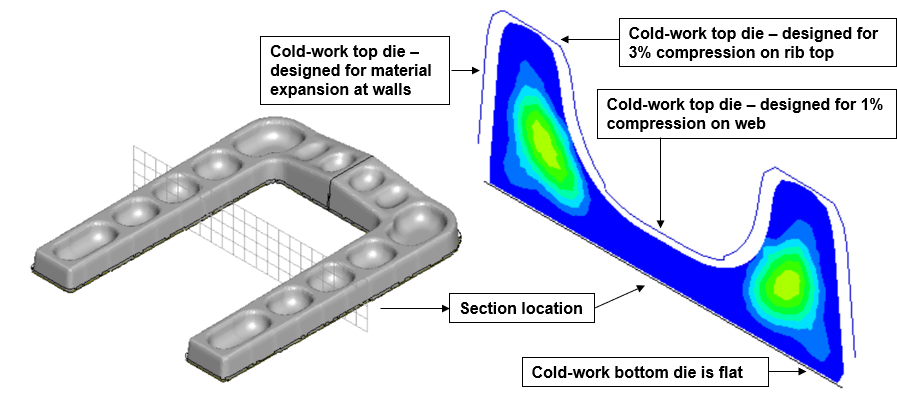
On the other hand, an impression-die forging usually requires a more complex process that involves a cold-work die set. Such die sets are designed to impress 1% to 5% cold-work. Typically, the compression is on the order of 1% in thinner web sections and 3% in thicker rib sections. Since the forging will be at room temperature for the compression (therefore the term – cold-work) it does require higher press loads than one sees in the hot forging operation. The following figure illustrates the elements of a cold-work die set.

Illustration of a typical cold-work die set for mechanical stress relief of an aluminum forging
In a previous case study, we demonstrated our capability to predict post-quench residual stress and distortion for an example forging. The effect of mechanical stress relief using compression dies on that same example forging is shown below. The post-quench residual stress (left) reaches as high as 20.0 ksi in this aluminum 7075 simulation. The post-cold-work residual stress (right) is significantly reduced. The reduced residual stress level in the stress-relieved state has significant advantages in terms of ease of machining (reduced distortion) and improved part performance.

Predicted residual stress post-quench (left) and post-cold-work-stress-relief (right) for an example aluminum forging
If this example relates to your production challenges, or if you have any questions about how these results might affect your projects, please do not hesitate to contact us. We would also be happy to answer any questions that you may have.
Case Study: Aluminum forging cold-work stress relief
As we discuss in a related case study, aluminum alloy heat treatment is a three-step process designed to achieve the desired properties. The process involves: 1) solution heat treatment (SHT) at an elevated temperature below the melting point, 2) quenching in a tank of fluid (e.g., 140-180°F water), and 3) age hardening. While providing good properties, the heat treatment has the negative side effect of creating bulk residual stress and distortion. One approach to mitigate this problem is the application of a post-heat treatment mechanical stress relief process.
Continue reading Case Study: Aluminum forging cold-work stress reliefNew Vlog: Machining Process Simulation
Our latest vlog discussing our machining simulation capabilities is up on our YouTube channel today and it is chock-full of information for those interested addressing distortion issues caused by machining.
Continue reading New Vlog: Machining Process Simulation