We recently learned that some hole drilling method and contour method results were highlighted in the August 2022 issue of Railway Track and Structures. The article is titled Residual stress investigation of ultrasonic impact treated and untreated thermite welds.
Continue reading Hill Engineering featured in Railway Track & Structures – August 2022Category: Residual stress measurement
Search results for Hill Engineering blog posts under the subject category residual stress measurement
Short Course Announcement – Residual Stress 101
The upcoming SEM Annual Conference and Exposition on Experimental and Applied Mechanics will include a Pre-conference Course titled: Residual Stress 101. The residual stress short course is scheduled for Sunday, June 12, 2022, from 9:00 a.m. to 5:00 p.m.
The course aims to cover a broad, practical introduction to residual stresses for students, researchers and industrialists with an interest in the subject. The course will be taught by Michael Prime, Michael Hill, Adrian DeWald, Luliana Cernatescu, Jeff Bunn, and Gary Schajer. Registration is currently open through the SEM Website.
Continue reading Short Course Announcement – Residual Stress 101Contour Method 101: Two-Dimensional Mapping of Residual Stress
We talk a lot about the residual stress measurement techniques we employ at Hill Engineering. One of the most commonly used is the Contour Method! Invented in the year 2000, and patented by Los Alamos National Laboratory, the contour method measures 2D residual stresses over a planar surface.
Continue reading Contour Method 101: Two-Dimensional Mapping of Residual StressIn the Field with Ryan: On-site Residual Stress Measurements
While we at Hill Engineering take pride in our ability to perform high quality residual stress measurements in our laboratory, we recognize that not all parts and projects can be easily transported.
That’s where we bring the measurements to you with our Residual Stress Field Team. Our laboratory engineers are capable of performing residual stress measurements across the globe, and have done so on many occasions.
Continue reading In the Field with Ryan: On-site Residual Stress MeasurementsSpecial Issue of Experimental Mechanics
We are in the process of organizing a special Issue of Experimental Mechanics, the journal of the Society for Experimental Mechanics. The issue will be devoted to Advances in Residual Stress Technology in honor of Prof. Drew Nelson of Stanford University, for teaching several thousand engineering students about the importance of residual stresses and for developing new optically based approaches for measurement of residual stresses, along with studies of residual stress effects on fatigue. To date, we have accepted proposed paper topics from almost 20 world-leading authors from around the globe.
Continue reading Special Issue of Experimental MechanicsCase Study: DART – automated residual stress measurement
Our latest case study highlights the many benefits of the DART™ automated measurement system, a tool we at Hill Engineering developed specifically to improve near-surface residual stress measurement techniques such as hole drilling and TRUEslot®.
Continue reading Case Study: DART – automated residual stress measurementContour method uncertainty
The contour method is a residual stress measurement technique that provides a two-dimensional map of residual stress on a plane. Hill Engineering’s uncertainty estimate for contour method measurements is summarized here. For additional information, refer to the references below.
The contour method uncertainty estimate accounts for two main, random uncertainty sources present in contour method measurements. This includes the uncertainty associated with random noise in the surface height profiles called the displacement error, and the uncertainty associated with choosing a specific analytical model to fit the surface profiles called the model error.
The displacement error is estimated using a Monte Carlo approach that applies normally distributed noise to the each of the original measured surfaces. The normally distributed noise is prescribed to have approximately the same magnitude as the surface roughness that arises from EDM cutting. Stress results are found using five different sets of random noise added to the surface height profiles, and the standard deviation of those five residual stress results at each spatial location is taken as the displacement error.
The model error is estimated by taking the standard deviation of the residual stress results using displacement surface profiles that have been fit with different analytical models (centered around what was determined to be the best fit). Each case uses a different number of fitting coefficients.
The total contour method uncertainty is then taken as the root-sum-square of the displacement and model errors with a minimum value of uncertainty set as a floor. The floor used is the mean of the total uncertainty (prior to the application of the floor), which is evaluated over a regular grid. The uncertainty estimate is assumed to have a normal distribution, which implies that one standard deviation represents a 68% confidence interval.
An illustrative example of the contour method uncertainty calculation is provided below from a measurement on a dissimilar metal welded plate.
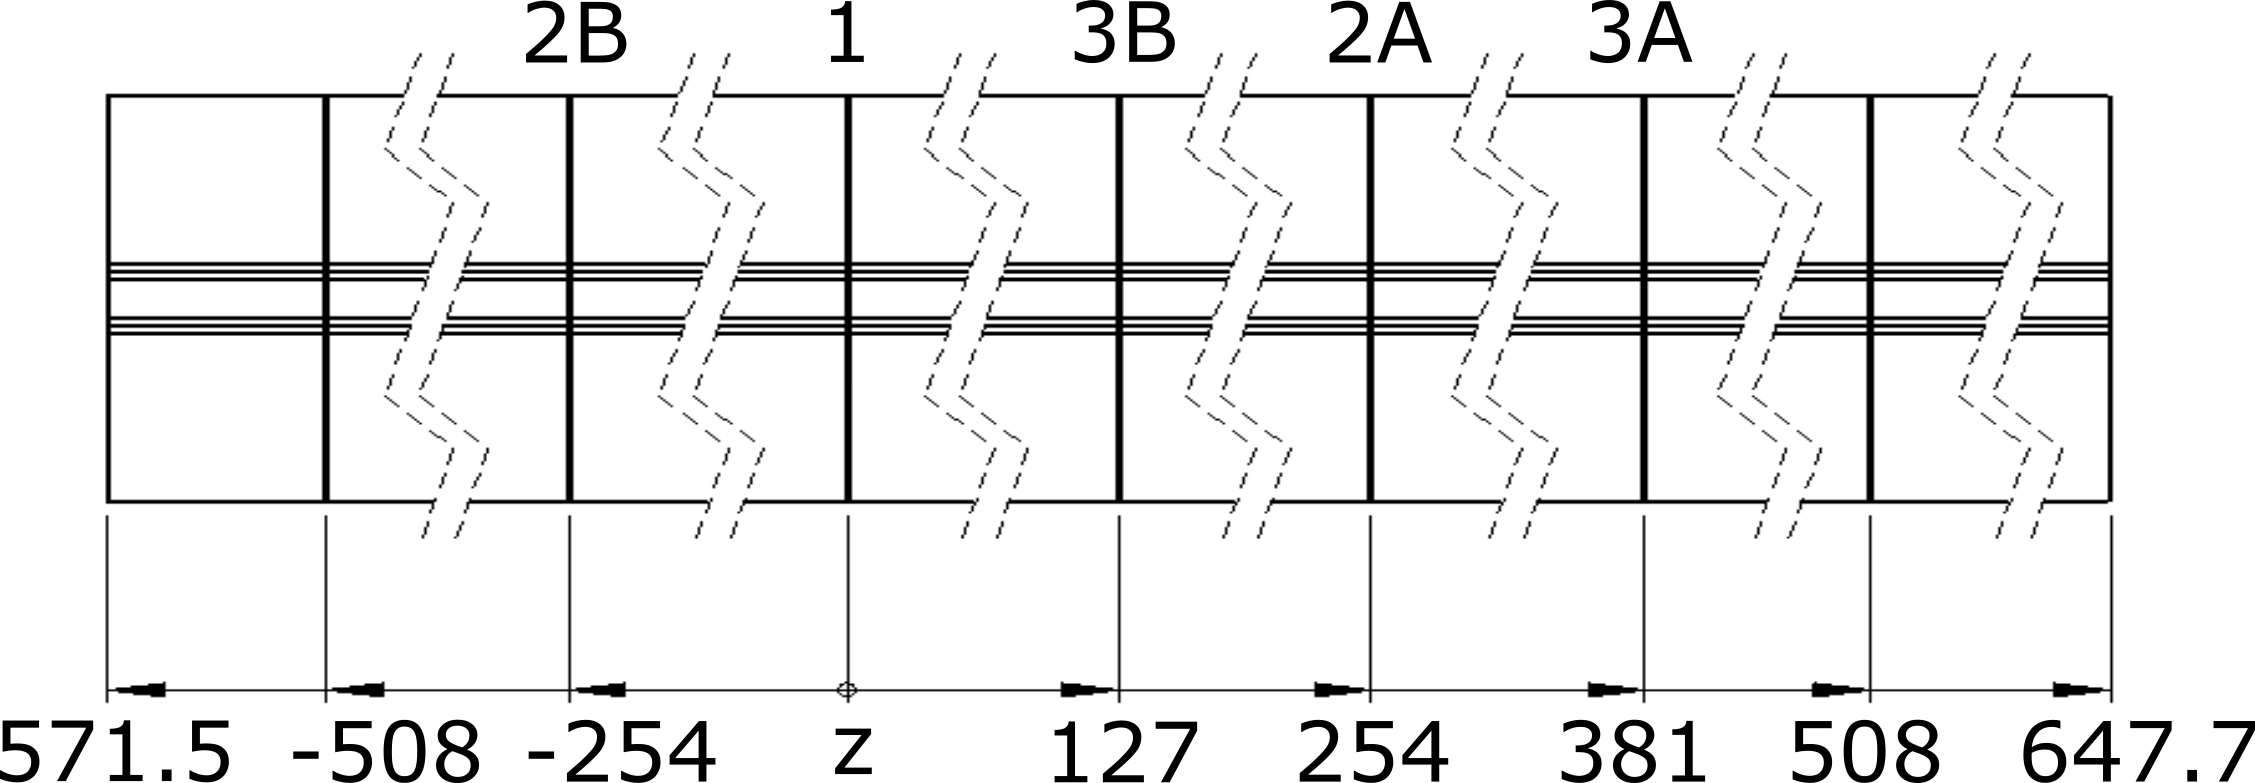
Stainless steel dissimilar metal dimensions and measurement locations (dimensions in mm)
The measured residual stress in the test specimen is shown below.
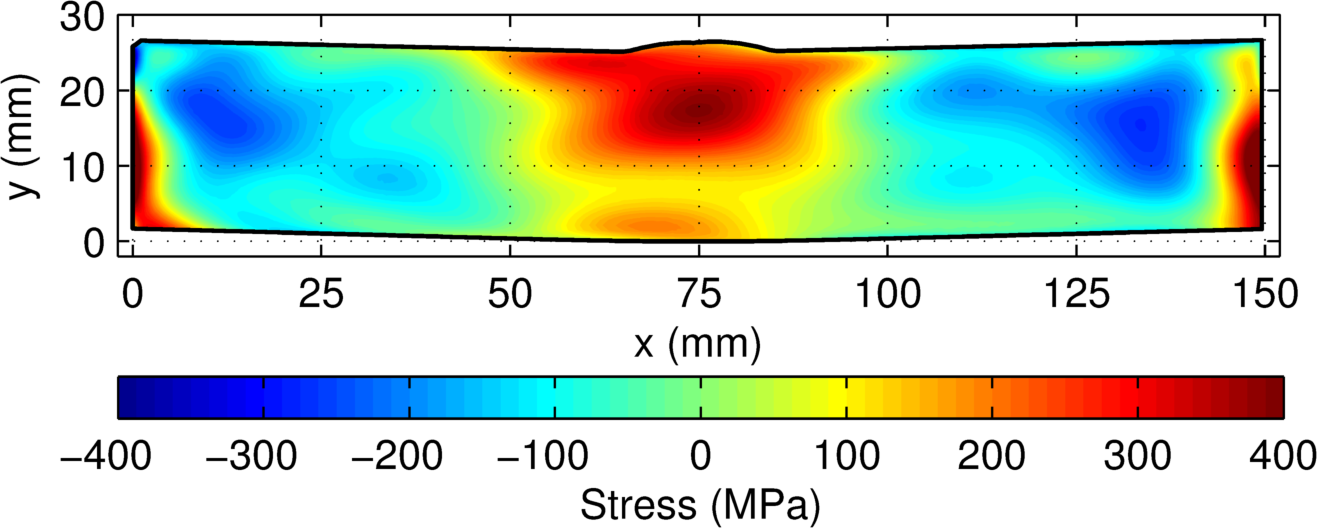
Measured residual stress (σzz)
The model error for the measurement (below) is largest along the part boundary (95th percentile is at 41.0 MPa). The displacement error (also shown below) is largest along the part boundary (95th percentile is at 11.8 MPa). The displacement error is much smaller than the model error. The total uncertainty has nearly the same distribution as the model error (95th percentile is at 42.5 MPa) with a 17.5 MPa floor covering most of the cross-section.
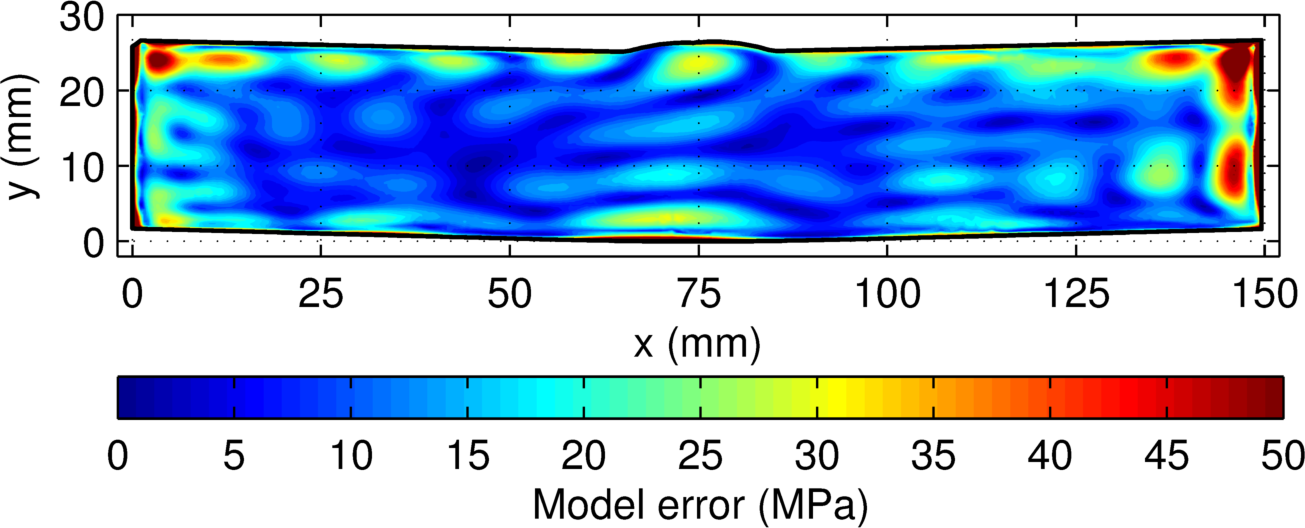
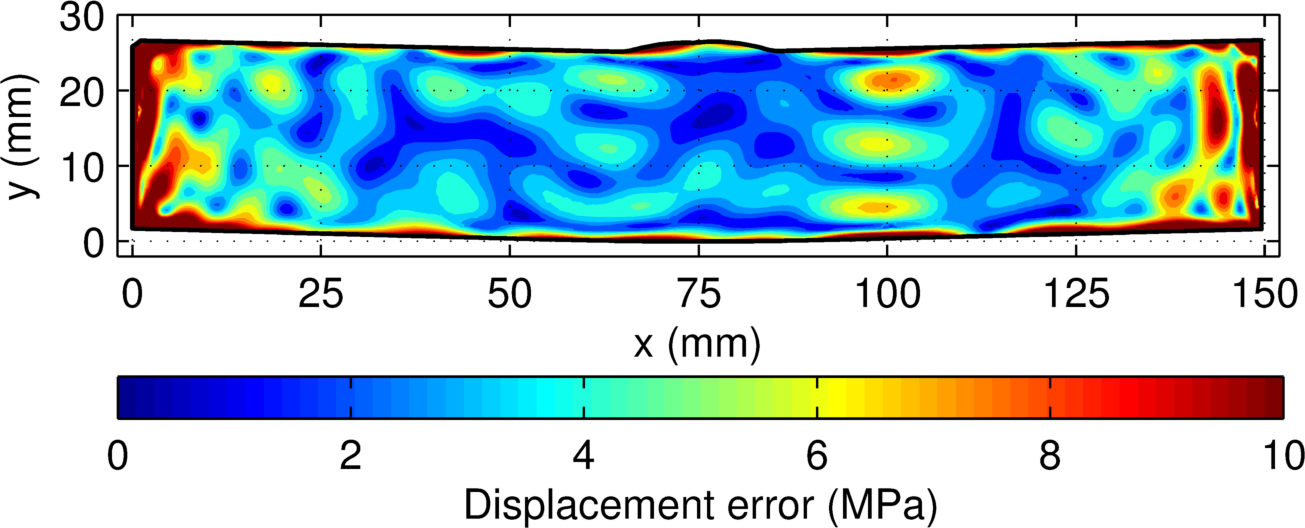
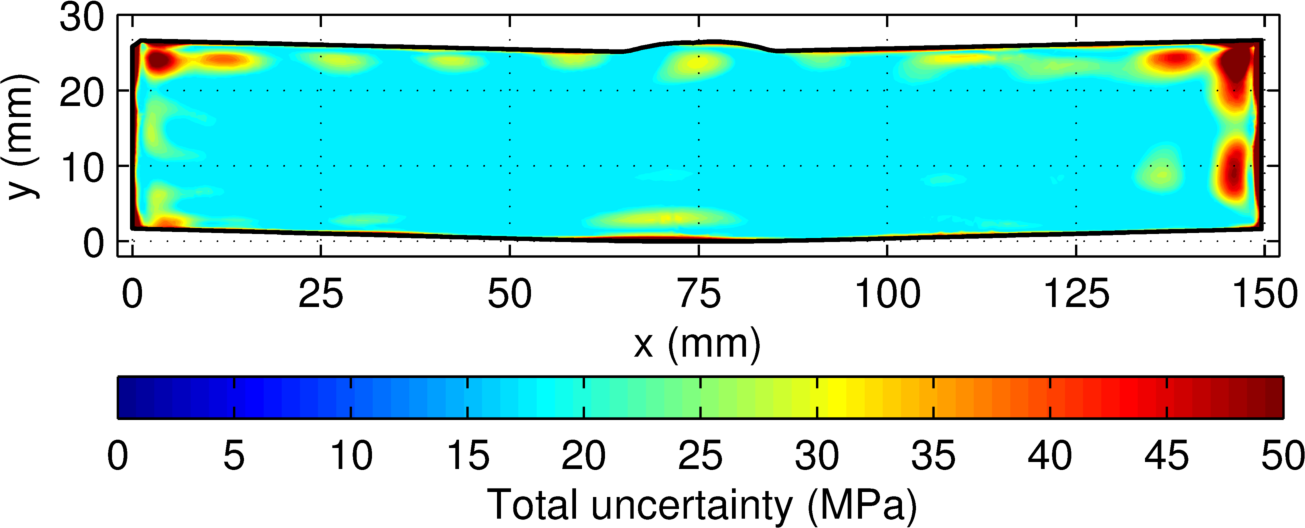
(top) Displacement error, (middle) model error, and (bottom) total uncertainty for the stainless steel DM welded samples
If you would like more information about using the contour method to determine a 2D map of residual stress in your parts please contact us.
Happy 20th birthday to the contour method
Today marks a major milestone in the field of residual stress measurement. The contour method, one of the most useful and advanced residual stress measurement techniques, was first successfully implemented on this date (August 16th) in 1999 by Mike Prime at Los Alamos National Laboratory. The most significant feature of the contour method is its ability to generate detailed two-dimensional residual stress maps like the one shown below. Please join us in wishing the contour method a very happy 20th birthday! Continue reading Happy 20th birthday to the contour method
Additive Manufacturing Benchmark Publication
Hill Engineering recently contributed to a publication related to residual stress measurement in additive manufacturing (AM) test specimens titled, Elastic Residual Strain and Stress Measurements and Corresponding Part Deflections of 3D Additive Manufacturing Builds of IN625 AM‑Bench Artifacts Using Neutron Diffraction, Synchrotron X‑Ray Diffraction, and Contour Method. The work was performed under the NIST AM-Bench program in collaboration with researchers from NIST, Los Alamos National Laboratory, University of California Davis, and Cornell High Energy Synchrotron Source. The abstract text is available here along with a link to the publication. Continue reading Additive Manufacturing Benchmark Publication
An Uncertainty Estimator for Slitting Method Residual Stress Measurements Including the Influence of Regularization
This paper describes the development of a new uncertainty estimator for slitting method residual stress measurements. The new uncertainty estimator accounts for uncertainty in the regularization-based smoothing included in the residual stress calculation procedure, which is called regularization uncertainty. The work describes a means to quantify regularization uncertainty and then, in the context of a numerical experiment, compares estimated uncertainty to known errors. The paper further compares a first order uncertainty estimate, established by a repeatability experiment, to the new uncertainty estimator and finds good correlation between the two estimates of precision. Furthermore, the work establishes a procedure for automated determination of the regularization parameter value that minimizes total uncertainty. In summary, the work shows that uncertainty in the regularization parameter is a significant contributor to the total uncertainty in slitting method measurements and that the new uncertainty estimator provides a reasonable estimate of single measurement uncertainty.