Aluminum alloy heat treatment is a three-step process designed to achieve the desired properties. The process involves: 1) solution heat treatment (SHT) at an elevated temperature below the melting point, 2) quenching in a tank of fluid (e.g., 140-180°F water), and 3) age hardening. While providing good properties, the heat treatment has the negative side effect of creating bulk residual stress and distortion.
Continue reading Case Study: Aluminum forging quench modelingTag: residual stress
Search results for Hill Engineering blog posts containing the tag residual stress
Aluminum forging quench modeling
Aluminum alloy heat treatment is a three-step process designed to achieve desired properties. The process involves: 1) solution heat treatment (SHT) at an elevated temperature below the melting point, 2) quenching in a tank of fluid (e.g., 140-180°F water), and 3) age hardening. While providing good properties, the heat treatment has the negative side effect of creating bulk residual stress and distortion. These side-effects are a direct result of non-uniform cooling during the rapid, time-dependent quench. Since there is an unavoidable difference in cooling rates between near-surface and internal areas, thinner versus thicker sections, locations first submerged versus those submerged last, and vertical versus horizontal surfaces, the generation of bulk residual stress and distortion is unavoidable. Oftentimes there are so many variables in play it can appear as though there is a high degree of randomness in the process if things are not carefully controlled. Our analysis tools can help.
The focus of this case study is the quench distortion of an aluminum aerospace forging. Using our modeling tools, we were able to capture the significant post-quench distortion in the forging, which is shown in the figure below. A rapid immersion quench, evenly applied, results in a very distorted and bowed output.
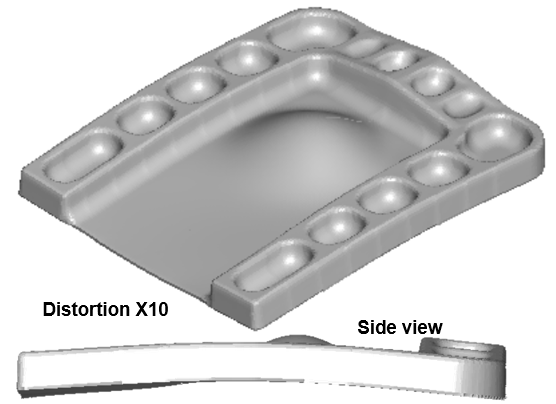
Illustration of predicted distortion of an aluminum forging during quench
Clearly, alternatives needed to be explored to mitigate the large amount of distortion. We considered several possibilities: slowing the cooling on one side (with a coating), removing the webbing before the quench (with machining), increasing the thickness of the webbing, or redesigning the forging with back-to-back symmetry by putting two parts into one forging. However, real-time physical experimentation of multiple options would be expensive and time consuming.
With modeling tools, we were able to quickly and effectively identify the most promising alternatives for improvement.
In this case, the biggest improvement came from removal of the webbing. The webbing is necessary for some of the initial forging operations, but does not need to be retained. It does not provide any coverage of the customer’s final post-machined part, and it is not necessary for heat treatment. Removing the webbing (i.e. cutting it off) prior to heat treatment requires an extra machining operation, but that is relatively inexpensive. As seen in the next figure, removing the webbing before quench resulted in a post-quench distortion that is remarkably reduced.
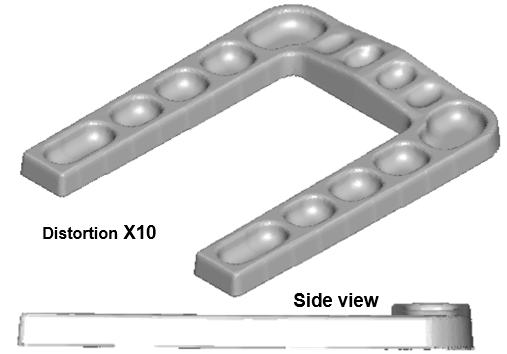
Illustration of predicted distortion for an alternate aluminum forging quench process that involves removing the webbing from the center prior to solution heat treatment and quench
The advantage of pre-production simulation is that problems can be found and solved beforehand, and the robustness of the proposed solutions can be tested and quantified.
Post-quench distortion is driven by bulk residual stress. That stress is created during the quench due to uneven cooling. Near surface cooling is much faster than the internal cooling of the part. This is unavoidable. However, using our modeling tools, the quench-induced residual stress can be predicted.
This predicted bulk residual stress is useful in follow-up simulations of post-machining distortion and part performance. The next figure shows the principal bulk residual stress as seen in section planes throughout the forging. Note that the residual stress reaches as high as 20.0 ksi in this aluminum 7075 simulation. This residual stress is post-quench and absent of any mechanical stress relief operations that are typically performed in subsequent steps.

Illustration of predicted post-quench bulk residual stress in an aluminum forging
If this example relates to your production challenges, or if you have any questions about how these results might affect your projects, please do not hesitate to contact us. We would also be happy to answer any questions that you may have.
Renan Ribeiro wins Henry O. Fuchs Student Award
Hill Engineering would like to congratulate Renan Ribeiro for winning the Henry O. Fuchs Student Award. Established in 1991, this award recognizes a graduate or recently graduated student that is working in the field of fatigue research and applications. The purpose of this award is to promote the education of engineering students in the area of fatigue technology. Continue reading Renan Ribeiro wins Henry O. Fuchs Student Award
Analysis of distorted aerospace part
We recently uploaded a new case study on the topic of part distortion caused by residual stress during machining. We wanted to dive a little deeper into the topic with an analysis of a distorted aerospace part. Here is what we found. Continue reading Analysis of distorted aerospace part
Case Study: Multi-step machining distortion modeling
Distortion of parts during the machining process is a significant problem faced by many machining vendors. This phenomenon typically results from the release and redistribution of residual stress in the material once the part is unclamped from the machine table. When not accounted for, machining distortion can lead to out-of-tolerance parts that either require reworking, or have to be scrapped. Continue reading Case Study: Multi-step machining distortion modeling
Machining distortion modeling with multi-step models including residual stress
Distortion of finished parts during machining is a significant problem which typically results from release and redistribution of residual stress in the material once the part is unclamped from the machine table. If not accounted for,
This case study focuses on machining modeling of a representative aircraft specimen using multi-step finite element analysis. Machining modeling was used to identify a machining strategy that requires less machine time (e.g., fewer part set-ups) to arrive at the final geometry, while also reducing the distortion of the finished part. The results illustrate how multi-step machining models can be used to provide upfront estimates of distortion, as well as guidance to optimize machining processes and obtain improved machining outcomes.
The part geometry considered in this case study is shown in Figure 1, and was designed to be representative of an aircraft part. The overall dimensions are 25 x 10 x 2.5 inches. The pockets, stiffener walls, holes, and tapering along the 25 inch dimension and 2.5 inch dimension provide a complex and representative geometry. The part is assumed to be machined from a 27 x 12 x 3.5 inch plate of aluminum alloy 7050-T7451 (stress relieved by stretching). While this material state typically exhibits low levels of residual stress, distortion during machining can still occur depending on the part geometry, machining strategy, and required tolerances.
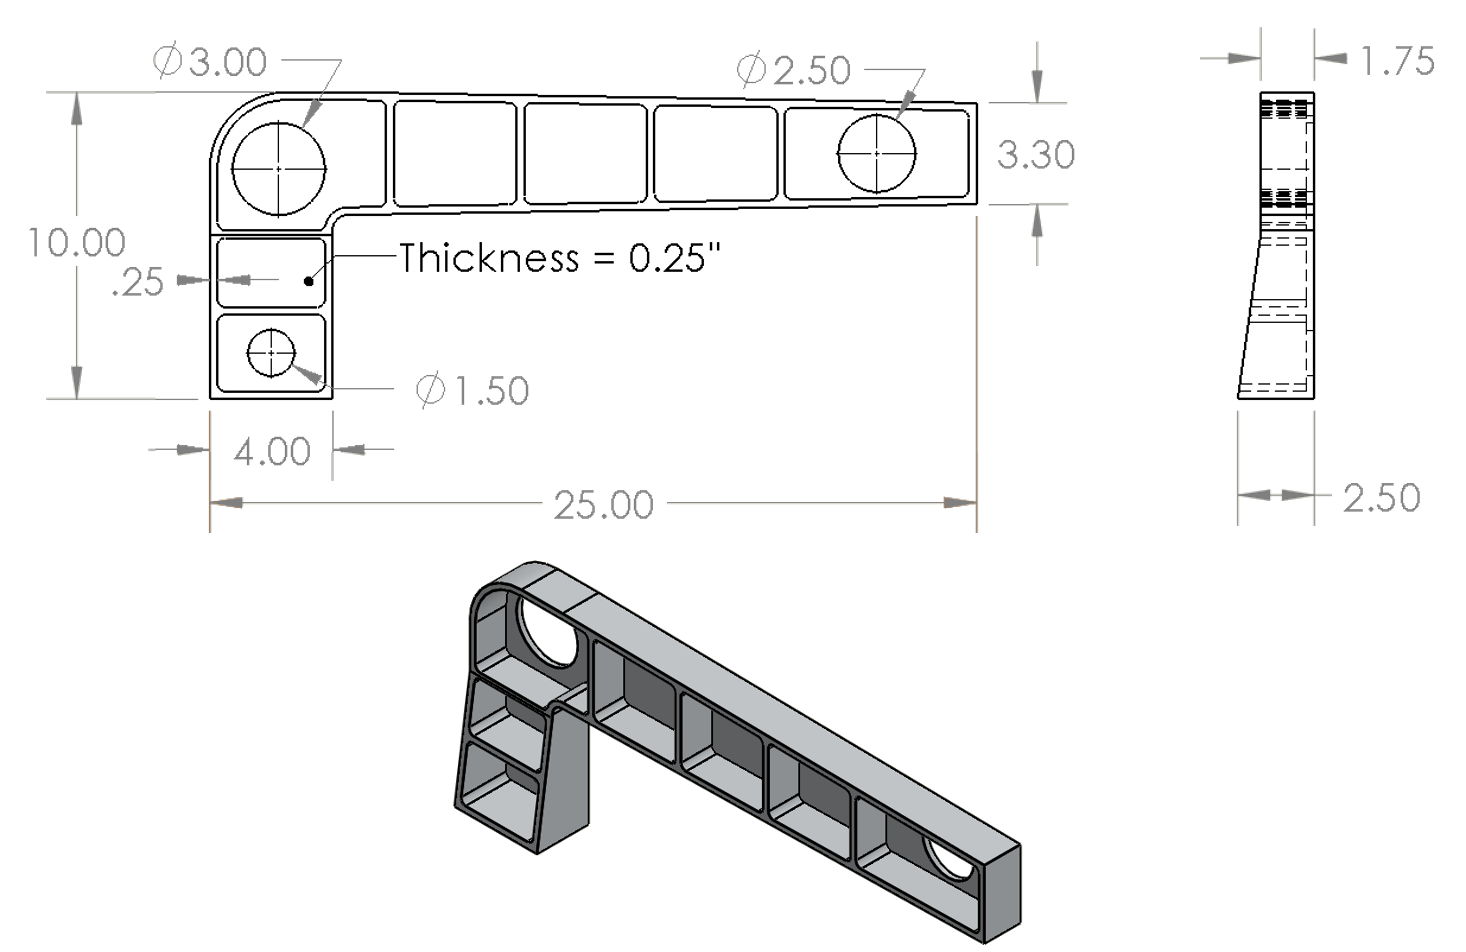
Part geometry (dimensions in inches)
The plate considered for machining this part provides extra material coverage on all sides. Figure 2 shows the amount of machining cover on each side, given the part is aligned with the mid-thickness of the stock plate with equal spacing relative to the sides of the stock. One inch of extra material is available on all sides when looking from a top view, while one-half inch of extra material is available along the thickness direction.
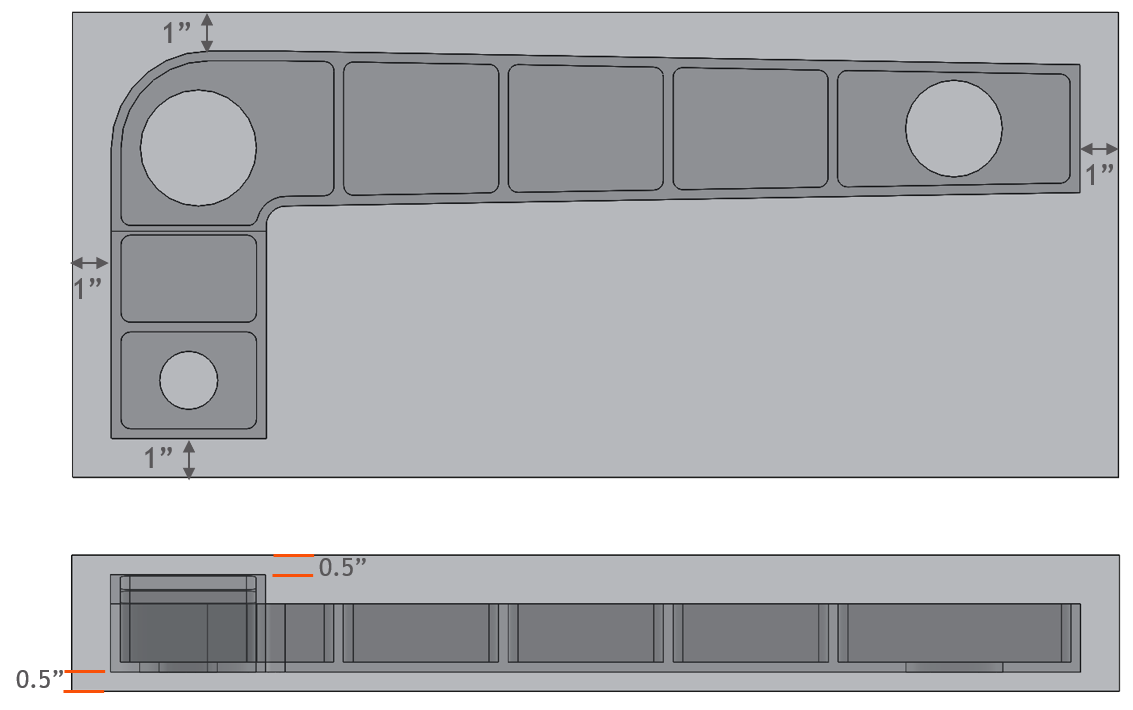
Part geometry within stock material when placed at the mid-thickness of the plate
The assumed residual stress in the stock plate material is shown in Figure 3. This is based on slitting method results published in [1] for 3-inch-thick plate of aluminum alloy 7050-T7451. The residual stress distributions are relatively symmetric and were normalized and scaled for the specific stock plate thickness used in the current study (3.5 inches). The rolling direction of the stock plate was assumed to be along the 27-inch dimension of the plate.
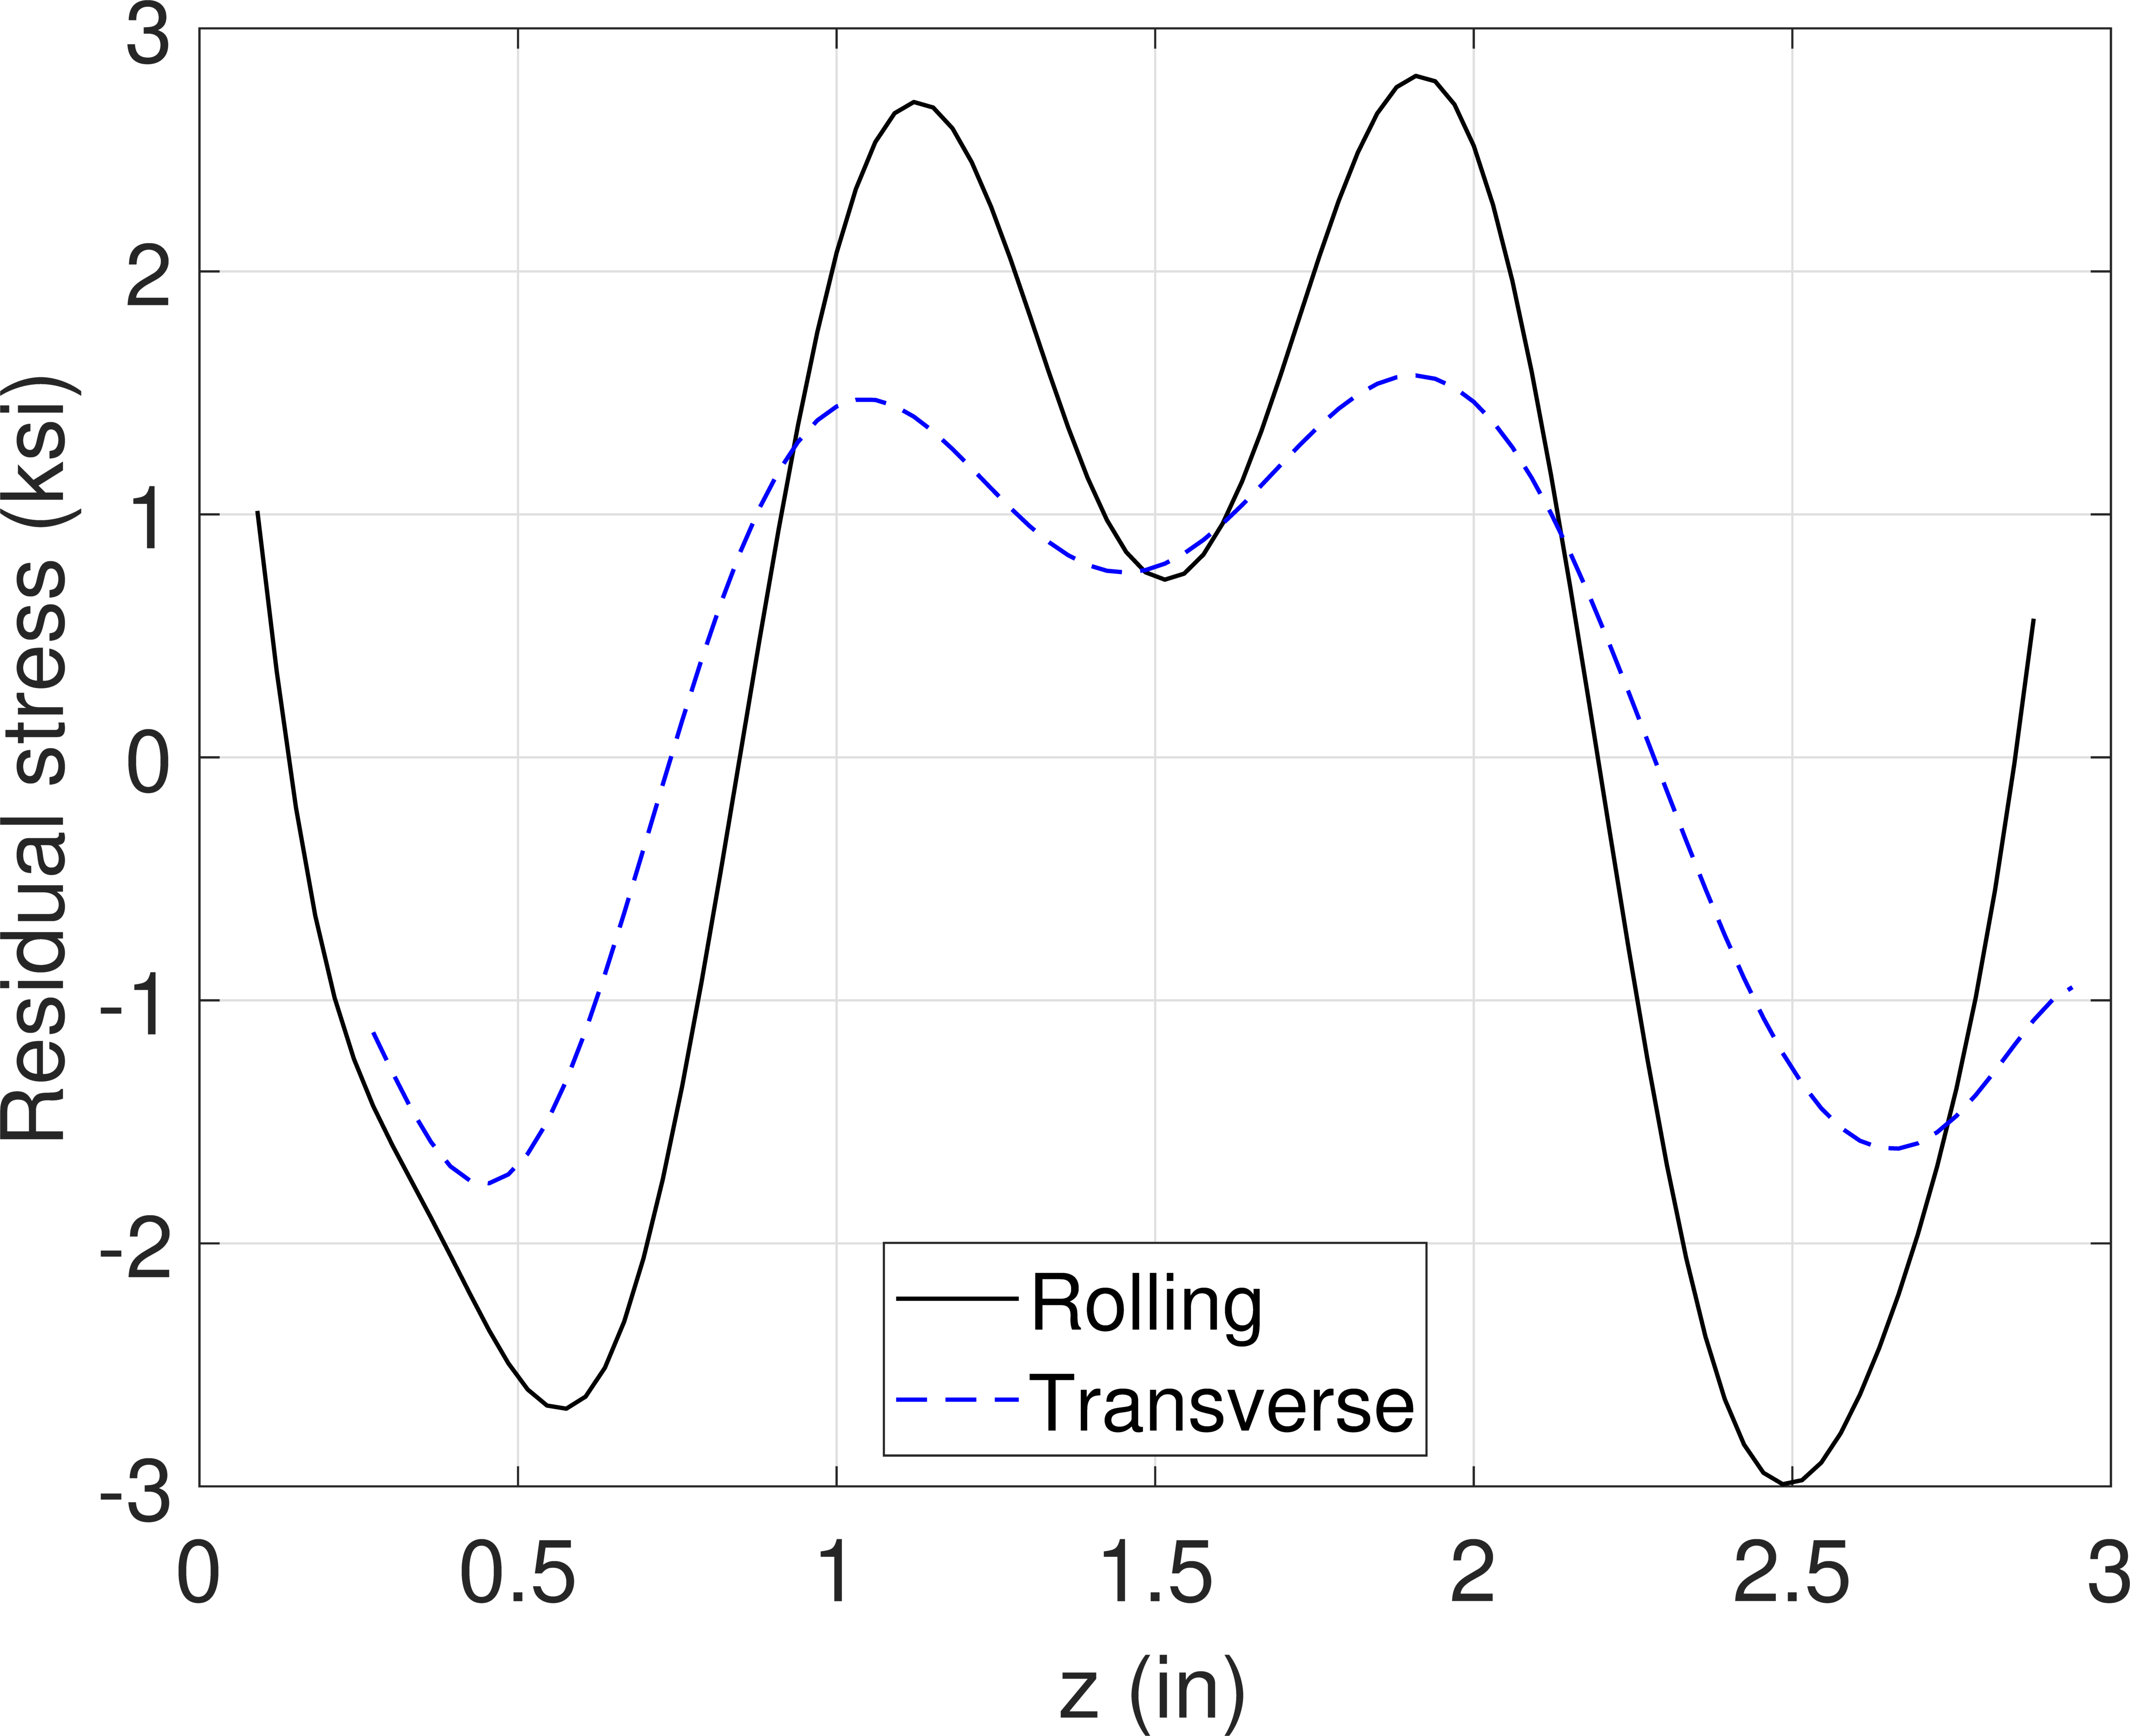
Residual stress measured in aluminum alloy 7050-T7451 plate (adapted from [1])
The baseline machining strategy considered is illustrated in Figure 4, in which the part is placed near the top surface of plate. Step 1 includes a rough machining pass on the bottom surface of the plate to obtain a flat surface for subsequent machining. Then, the part is flipped on the machine table. Step 2 involves an initial rough machining of the pockets and stiffener walls. Step 3 flips the part once again and finalizes machining of the bottom flat surface of the part. Finally, the part is flipped for the last time, and machining of the pockets, holes, and stiffener walls is finalized to arrive at the final geometry. This machining strategy includes a total of 3 flips on the machine table.
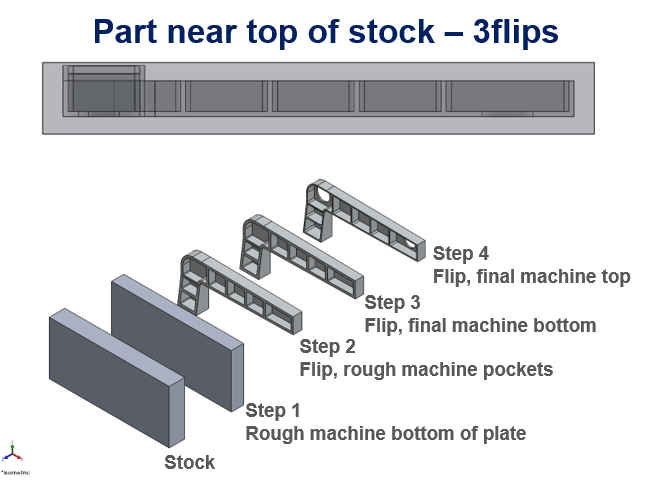
Part placement and baseline machining strategy
Multi-step finite element models were employed to obtain estimates of the distortion and residual stress at the end of each machining step. For brevity, the displacement of the finished part only (step 4) is shown here. Figure 5 shows a contour plot of the displacement along the z-axis (U3, perpendicular to the bottom flat surface of the part) on a scale that varies from -0.025 to 0.025 inches. The displacement U3 range (maximum minus minimum value) is about 0.030 inches. Maximum displacement is observed near the corner region of the part that contains the 3-inch diameter hole (shown in Figure 1).

Contour plot of displacement along the z-axis (U3) for the finished part from the baseline strategy
Modeling was performed to simulate many different machining approaches. The optimal machining strategy places the part at the bottom surface of the stock plate as illustrated in Figure 6. The first step involves rough machining of the pockets and stiffener walls. The part is then flipped, and final-machined on the bottom flat surface. The second and final flip on the machine table provides the setup to final-machine the pockets, holes, and stiffener walls. This machining strategy uses a total of 2 flips (one less than the previous strategy).
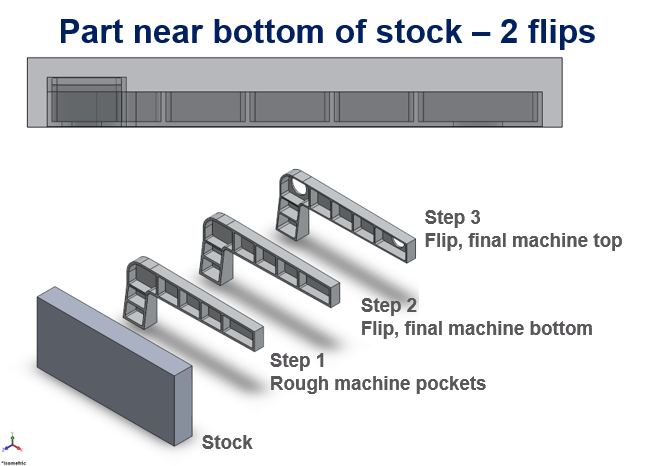
Part placement and optimized machining strategy
The part distortion for the optimized machining strategy is shown in Figure 7 (using the same color scale as in Figure 5). Compared to the baseline strategy (Figure 5), a different displacement pattern is observed, although the maximum values are near the same region (i.e., near the corner of the part with the 3-inch diameter hole). The displacement range is 0.013 inches for the optimized machining strategy, which is significantly lower than observed from the baseline approach (0.030 inches). It is important to note that the optimized strategy (which places the part near the bottom of the stock) not only provided a finished part with lower amount of distortion, it also required less machine time (fewer flips), which represents an improvement in efficiency of the machining process.

Contour plot of displacement along the z-axis for the finished part from the optimized strategy
This case study considered multi-step machining models of a representative aircraft specimen, including the residual stress in the incoming stock material, to assess the distortion of the finished part. Two different machining strategies were presented, which included differences in part placement within the stock material, and sequence of machining steps. The results identify an optimized machining strategy that uses fewer flips on the machine table (setups) to arrive at the final geometry, while also reducing the distortion of the finished part. The results illustrate how multi-step machining models can be used to provide upfront estimates of distortion and guidance to optimize machining processes in order to obtain improved outcomes. Please contact us for additional information.
Propulsion Safety & Sustainment Conference 2020
Hill Engineering will be presenting at the upcoming Propulsion Safety & Sustainment Conference (PS&S) in Denver, CO on April 20th through April 23rd. We invite you to come see us. The mission of this conference is to proactively address or prevent problems with safety, readiness, reliability and sustainment within the tri-service turbine engine fleet, through the transition of existing and emerging technologies. Hill Engineering’s presentation will include a summary of recent work related to predicting residual stress and airfoil distortion from shot peening and laser shock peening. The abstract text is presented below. Continue reading Propulsion Safety & Sustainment Conference 2020
Strain gage in a bottle
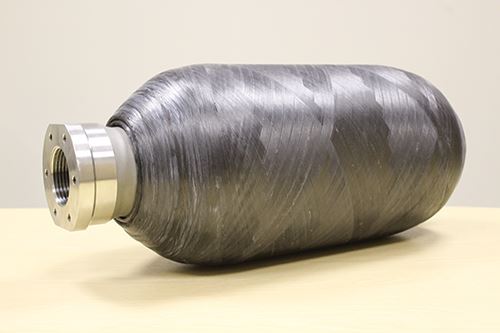
A representative composite overwrapped pressure vessel. Image courtesy of CompositesWorld: https://www.compositesworld.com/articles/thermoplastic-composite-pressure-vessels-for-fcvs
We’re putting something in a bottle, and no, it’s not an SOS to the world. It’s a strain gage!
Hill Engineering has recently developed technology to orient and apply strain gages inside a pressure vessel with restricted interior access. Continue reading Strain gage in a bottle
Residual Stress 101 vlog
Today, we’ve released the newest episode of our vlog: Residual Stress 101. The video is a return to basics, discussing the core of what it is we do here at Hill Engineering.
If you haven’t checked out our YouTube channel, it might be time. Our mission is to post content that helps highlight the capabilities of our organization, so that everyone can see how and why residual stress is important to their manufacturing processes.
Today’s post is a broad overview of what residual stress is, including the several techniques for measuring residual stress found in our lab. Look for future content that delves further into each technique, and contact us if you have any further questions or want to see a video related to something we haven’t discussed.
Case Study: cold hole expansion process modeling
Cold hole expansion (Cx or cold expansion for short) of fastener holes is a technique that has been widely used in the aircraft industry to improve the fatigue performance of structural components. The cold hole expansion process introduces compressive residual stress near the vicinity of the hole that slows crack growth and can significantly improve fatigue performance. Continue reading Case Study: cold hole expansion process modeling